Showing posts with label makeup. Show all posts

Tuesday, July 10, 2012

Coral + Turquoise: How To Wear This Trendy Makeup Melody

By Vera Tov


Vera is a certified makeup artist based in New York. A graduate of a protégées Make Up Designory school (MUD). Vera has all of the necessary skills and tools to create an unique and fresh look for any occasion. Vera’s ability to realize the client's vision, re-create a look from a photograph or film, or develop a unique look, camouflaging imperfections while enhancing the natural beauty is truly unsurpassed.
In Vera's words: 
My makeup had been confiscated on more than one occasion in High School. How could the teachers not understand the fact that a mirror compact was an extension of my arm, and eyeliner – a wand, without which I felt powerless. Silly, of course, I know. Well, I was a teenager then, and now…I feel the same exact way now!


Coral + Turquoise
How To Wear This Trendy Makeup Melody 

If you have had any interaction with the Planet Earth, you must know by now that two of the trendiest colors this season are turquoise and coral, as well as other variations of the blue and orange families. Worn with other colors or together, these colors complement any skin tone. Turquoise and coral are examples of natural materials that have are commonly used in jewelry. Historically, Coral has been associated with well-being and its “power” to relieve excessive worry. Similarly, turquoise has been fascinating people throughout millennia for evoking inner peace by absorbing negative energy. Although these may be myths, unique colors of these materials have transitioned into clothing and makeup more noticeably this season than ever before. I happen to find these colors, paired with yellow gold, completely irresistible.


The reason they create such an intriguing effect is the color theory. If you’ve ever taken an art class, there is likelihood that you’ve covered the basics, such as the primary and secondary colors. Perhaps, you’ve even created a color wheel as the one below.


Pairs of colors that appear opposite each other on the color wheel are complementary. When worn together, they have a very dramatic impact. Turquoise, which is closest to blue-green, would be exactly across coral, which is closest to red-orange. But unlike primary (red, yellow, and blue) and secondary colors (orange, green, and violet), turquoise and coral possess just the right amount of intensity to make enough of a statement without looking overwhelming.

When it comes to using makeup, I can’t seem to shake off certain stereotypes associated with blue/turquoise eye shadow and orange/coral lipstick (think real-life Russian nesting dolls!). Although it is not a look I would personally choose to wear myself, there are no real rules in makeup. So, if you bear no such associations, and it’s a look you find attractive, I’m truly envious!

Below are alternative ways of wearing both colors in close proximity:
  1. Wear coral lipstick and turquois earrings or necklace. Keep eye makeup neutral (gray, cream, taupe, or brown).
  2. Try the opposite – turquois accents on the eyes, paired with a nude lipstick or a light peachy gloss. Coral-toned jewelry will look beautiful.
  3. In this Maybelline ad featuring their new(ish) Color Tattoo gel shadows, the model is wearing both colors, except the colors are more like teal and tangerine. Notice that with her eyes featured as the focus of the look, the lips are kept very natural. Also, keep in mind that this is an advertisement. To make these colors more wearable in real life, it is probably advisable to reduce the amount and/or intensity of the hues.
  1. For a variations on applying both colors on the eyes, I suggest the following:
  • If you have blue eyes, use an orange/golden shadow on the eyelids, and teal eyeliner along the bottom lash line. Wear black or dark brown eyeliner to define the upper lash line.
  • If your eyes are brown, like mine, try teal or another color in the blue range on your eyelids, accented with a bit of gold in the inner corners and/or along the lower lash line.
  1. These beautiful colors look more dramatic against tanned skin, so a little bit of bronzer could be a plus. Just, please, try not to overindulge…

  2. One more tip: just about all eye shadows tend to crease, especially in the summer. The brighter the colors you wear, the more pronounced the creasing will appear. You can lessen, if not avoid altogether, the creasing by applying an eyelid primer prior to your eye makeup.


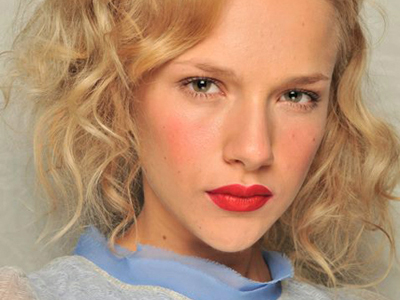
In this photo, Taylor is wearing both colors on her face. However, the colors 
are muted and the emphasis on both the lips and the eyes are well balanced.


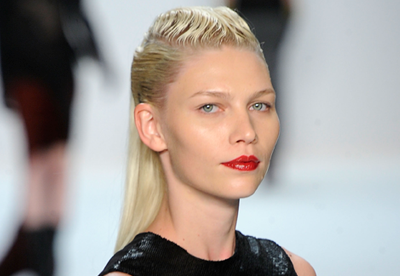
Here is another option: turquois liner, neutral shadow and nude lips.


 This is the way I would most likely incorporate turquoise into my 
make up, being that my eyes are of similar shape and color.  

Final thought: I absolutely love turquois and coral (just not in the way described above) because it reminds me of tropical vacations—Caribbean Sea, snorkeling, and sipping cocktails—as well as snacking on papayas mango, and watermelon. Just sitting in my backyard typing this makes my skin feel a little bit warmer on this breezy day and my heart full of anticipation of where this summer will take me.


Monday, June 18, 2012

Makeup: Stop! In the name of red lips!

By Vera Tov


Vera is a certified makeup artist based in New York. A graduate of a protégées Make Up Designory school (MUD). Vera has all of the necessary skills and tools to create an unique and fresh look for any occasion. Vera’s ability to realize the client's vision, re-create a look from a photograph or film, or develop a unique look, camouflaging imperfections while enhancing the natural beauty is truly unsurpassed.
In Vera's words: 
My makeup had been confiscated on more than one occasion in High School. How could the teachers not understand the fact that a mirror compact was an extension of my arm, and eyeliner – a wand, without which I felt powerless. Silly, of course, I know. Well, I was a teenager then, and now…I feel the same exact way now!


In the Name of Red Lips!
You may have heard that every woman should own a well-fitting black dress and a red lipstick.  However, classic red lips can be as tricky to pull off as fighting a red light ticket. The truth is, every woman can wear some type of red on her lips.  Still, several factors contribute to what will work best for you.  


Some guidelines and suggestions:
  • It helps to know your skin undertone.  While doing some research, I’ve come across many articles that talk about skin undertone being the determining factor in choosing red lipstick.  In fact, the general rule is that if you have a fair/rosy complexion, you should choose blue-based reds (no, they’re not actually blue!) and if you have yellow undertones, orange-based/warm reds will suit you better.  What I’ve learned is that you can do the exact opposite to create a more dramatic/unexpected effect.

Top – orange-based/warm red
Bottom – blue-based/cool red


  • Think texture. Some of the textures include matte (no shine), creamy (some shine), and sheer (usually quite shiny).  If you already own a matte lipstick, you can add some shine to it by patting on some gloss on top.  Conversely, to mattify a creamy lipstick, blot your lips with a plain tissue (not the soft kind). You can even pat a little powder over the lips.
  • Banish bleeding.  Bleeding of the lipstick that is.  While we talk, laugh, or eat, lipsticks try to creep out through the tiny lines around our lips. Lip liner helps prevent that when applied before the lipstick.  I actually prefer lining lips with a light neutral lip liner instead of red.
  • Don’t fear – go sheer! Sheer lipsticks and colored glosses aren’t as pigmented as creamy and matte ones. Therefore, they’re neither as intense nor long-lasting. They are great for those who want to wear the classic color without the drama. You may need to keep it with you to reapply as the color fades.  If you already have a bright red lipstick that you’re not comfortable wearing, there is a great trick you might like: rub some  lipstick on your finger, then apply it all over your lips, staining them.  Don’t worry about trying to get a crisp line; the edges should be soft. Then apply some gloss, lip balm, or even just some Vaseline.  The effect is headturningly (not a word, according to MicrosoftWord) gorgeous, in a more natural, nonthreatening way.
  • Stunningly simple.  If you choose to make your red lipstick the focal point, keep the rest of the makeup more natural.  As seen on many runways during this spring's Fashion Week, models wearing red lipstick seemed to be almost free of eye makeup.  I recommend the following simple steps (Steps 1 and 2 are optional): 1) Apply a matte eyeshadow closest to your own skin color all over the lids, up to the eyebrows, 2) Define the creases and the bottom lash line with a shadow slightly darker than your skin color, 3) Define your upper lash line with a black or brown eyeliner, and 4) Apply mascara to top and bottom lashes


Products you may like:

MAC's Ruby Woo Matte Lipstick
Recommended by makeup artists as one that complements every complexion
(I do not own this lipstick, therefore cannot comment)


L'Oreal Infallible Never Fail Lipgloss, Rebel Red 315
This can be applied very sheer or layered to look more dramatic.  It has excellent staying power for a gloss.  What I like to do is apply one layer, then blot my lips with a tissue, then apply another layer.


Thursday, May 17, 2012

Makeup: Looking Good On Camera [Tips n' tricks!]

By Vera Tov


Vera is a certified makeup artist based in New York. A graduate of a protégées Make Up Designory school (MUD). Vera has all of the necessary skills and tools to create an unique and fresh look for any occasion. Vera’s ability to realize the client's vision, re-create a look from a photograph or film, or develop a unique look, camouflaging imperfections while enhancing the natural beauty is truly unsurpassed.
In Vera's words: 
My makeup had been confiscated on more than one occasion in High School. How could the teachers not understand the fact that a mirror compact was an extension of my arm, and eyeliner – a wand, without which I felt powerless. Silly, of course, I know. Well, I was a teenager then, and now…I feel the same exact way now!

Win a FREE MAKEOVER! 
Welcome Vera by commenting on our Facebook post 
and be included in a drawing to get your makeup
 done—for an event, for fun...for free! 


Looking Good on Camera


Here are some of the tips to help you look your best in photos! 

First of all, and this is from personal experience, regardless of how the photographer tells you to pose, make sure you take photos in your most flattering pose. Practice in front of the mirror to find whether you look best facing forward, with your face slightly to the side, with chin raised…you get the idea. It’s also a good idea to have someone take multiple snap shots, because it’s sometimes difficult to judge how you’re going to come out on camera based on your reflection in the mirror. Also, as your mother has told you – Don’t slouch!

Say “Cheese!"— NONSENSE! You don’t need to bare your teeth if you don’t feel it makes you look your best. It’s up to you. If you prefer the mysterious Mona Lisa half-smile, then that’s how you should be photographed.


 Keep your hair away from your eyes. It is not a flattering look on anyone. Enough said.


And now – the makeup!

  • Because bright lights and flash can make you look washed out, go for shades slightly darker and more saturated than you normally would. That means foundation that’s just a bit darker (make sure it’s blended well into your neck), brighter blush, and lip color.
  • Foundation is such a broad topic that I will have to dedicate a separate post to choosing the correct match, coverage, finish, as well as proper application techniques.

  • Shiny t-zone is not pretty. Make sure to keep your face matte with a light application of powder. But if you feel that your face is getting oily or sweaty, take a plain tissue (not the soft, lotion kind), and hold it to your forehead, nose, and chin. Don’t press, because you want the tissue to absorb the moisture, not the makeup)
  • You want your eyes to look well defined in photos, so make sure to wear black eyeliner and an extra coat of mascara. And false lashes are a plus. But if you’ve never used them, don’t try to apply them for the first time before being photographed.

  • Don’t use your eyeliner on the waterline, or the inner rim of your eyes, because it will make them look smaller.

  • Stay away from shimmer as much as possible. When used incorrectly, shimmery makeup will age you. The only place you can use shimmer is just a touch of it in the inner corners of your eyes.


Example of a shiny t-zone. It’s even more visible on camera than in person.


I have to admit that Natalie looks perfect in any makeup and in any pose. However, few tips that we can take from this photo are that her face is neither shiny nor shimmery. Her makeup is quite natural, and yet her features appear defined. Finally, her cheeks are rosy enough to look healthy but not overpowering.


Tuesday, July 12, 2011

Makeup in a Minute - Here's How!

By Ettel Chava Rosenbaum
Chava is a 26 year old mother of two girls living in Kensington, NY.  She has been a practicing makeup artist for nearly seven years and recently began doing makeup for the exploding field of religious women's theater...in which she also loves to perform! Chava offers lessons to women, teaching them how to apply their own makeup like a professional. In addition to makeup, her passions are singing, comedy and keeping her kids out of her shoe rack. Chava is available to do makeup for simchas and productions in New York. You can contact her to book a consultation or job by e-mailing beautybychava@rocketmail.com


People often ask me about doing makeup in a real hurry. 


Never mind the five minute face. I'll give you a one minute face!


Apply some undereye concealer and foundation if you need. Then get a cream multipurpose color. In a pinch you can use a berry lipstick for this but you can also get a product made for this like the Nars Multiple, or Boomstick Color by Cindy Joseph. (The boomstick only comes in one color but it is the ideal sheer berry shade which works on all tones and in all seasons, so get that color whenever possible, in any product.)

Using your middle finger, tap the cream color on your cheeks, center of the brow-bone and lips. Blend, adding product until you are satisfied. Set face with sheer powder and you're done. This adds the right shade to any part of your face that would be warmed by natural circulation giving you a super fast natural look! 

Wednesday, June 29, 2011

Bringing Light To Your Face

By Ettel Chava Rosenbaum

Chava is a 26 year old mother of two girls living in Kensington, NY.  She has been a practicing makeup artist for nearly seven years and recently began doing makeup for the exploding field of religious women's theater...in which she also loves to perform! Chava offers lessons to women, teaching them how to apply their own makeup like a professional. In addition to makeup, her passions are singing, comedy and keeping her kids out of her shoe rack. Chava is available to do makeup for simchas and productions in New York. You can contact her to book a consultation or job by e-mailing beautybychava@rocketmail.com


BRINGING LIGHT TO YOUR FACE 


Nothing is as flattering to the face as candlelight. It illuminates the center of the face bringing it in focus, with a diffusing glow that diminishes blemishes, and brings out the contours. Everyone sparkles in candlelight. 


If you have a special occasion, a summer wedding perhaps, you can give yourself that candlelit soft focus even if there are no candles present. 


What You Need:
All you need is a shimmery highlighter, either a cream or a powder. A highlighting powder can be a sheer highlighting eye shadow in a glowing shade like pale gold or champagne. Cream highlighters come in many forms, but if you don't have one, simply use a sheer foundation two shades lighter than you're skin. If you're using a cream, use your ring finger to apply it. If you prefer powder, use a fluffy shading brush.

How To Apply:Gently tap the cream or dust the powder into the inner parts of your cheeks, from the sides of the nose, blended out to the middle to the apple, a bit at the bridge of the nose, the chin, corners of the mouth and between the eyebrows. Also blend from the inner corners of the eyes, lightly down to the inner cheeks. 


It should just be a slight glow, not too much and well blended. In the dim lights of a simcha hall it will look stunning! And this look is especially perfect for photos! 

Thursday, June 16, 2011

Summer Makeup: How to keep it from melting

By Ettel Chava Rosenbaum

Chava is a 26 year old mother of two girls living in Kensington, NY.  She has been a practicing makeup artist for nearly seven years and recently began doing makeup for the exploding field of religious women's theater...in which she also loves to perform! Chava offers lessons to women, teaching them how to apply their own makeup like a professional. In addition to makeup, her passions are singing, comedy and keeping her kids out of her shoe rack. Chava is available to do makeup for simchas and productions in New York. You can contact her to book a consultation or job by e-mailing beautybychava@rocketmail.com
Mention LadyMama when you book me for any occasion and get a 20% discount on TWO faces(including the Kallah's). And as usual, kallahs get a free trial! Spread the word! Call me at 718-986-1211.


Summer Fun With Makeup
How to keep your makeup for melting off your face in the humidity!

We all know the feeling, especially if you're in New York. The air is soupy in the summer months and makeup doesn't stand much of a chance. So how do you keep it on?

Rule number one: the less there is in the first place, the less that can come off. Keep the look simple and light so there is less weight. For example, most people don't need a daily foundation in general, so to even out your skintone and protect your skin from damage use a tinted moisturizer instead of foundation. It absorbs into the skin rather than sitting on it, so it won't come off as fast.

Great tip: Don't have tinted moisturizer? No problem. Mix some of your mineral powder or liquid moisturizer into your regular moisturizer to get your desired level of tint and apply with sponge or fingers.

Tacky cheeks from moisturizer, or sweat or oil, can make your blush stick to your skin as you apply it and streak. To avoid this, dust a thin veil of colorless translucent powder on first so your blush with have a dry even surface to blend onto.

Great tip: Coral blush is the must-have color this summer and its looks great on everyone! Coral is like peachy pink but brighter, more tropical looking and leaning more towards the pink side than orange.

Eyes can be tough durring the summer. Lids get oily, you sweat, mascara smears, liner melts...

Monday, March 7, 2011

How to get those smokey eyes!


By Chava Rosenbaum
Chava is a 26 year old mother of two girls living in Kensington, NY.  She has been a practicing makeup artist for nearly seven years and recently began doing makeup for the exploding field of religious women's theater...in which she also loves to perform! Chava offers lessons to women, teaching them how to apply their own makeup like a professional. In addition to makeup, her passions are singing, comedy and keeping her kids out of her shoe rack. Chava is available to do makeup for simchas and productions in New York. You can contact her to book a consultation or job by e-mailing beautybychava@rocketmail.com
Mention LadyMama when you book me for any occasion and get a 20% discount on TWO faces(including the Kallah's). And as usual, kallahs get a free trial! Spread the word! Call me at 718-986-1211. 
--------


SMOKEY EYES 

The classic, sultry smokey eye is the holy grail of makeup. I'm gonna give you a big deep dark makeup artist secret: pretty much any look that involves blending a color away from the eye, can be called a smokey eye. There are many variations, from the classic charcoal and carbon black version to simply smudging a creamy black eye pencil around the eye. (I plan to make a video demonstration a smokey eye when time allows!)

I'm gonna give you instruction now for a basic version that can work with almost any color eye shadow. If you have small eyes, work with lighter colors and you may want to skip the first step. This version works especially well for those with hooded lid, or who don't have defined creases.

This version involves three colors of eye shadow, preferably in the same color family; like brown, copper and champagne, or for smaller eyes; taupe, greige and nude or vanilla.

1. Start with black eye liner pencil or gel. Line the upper lid close to the lashline, but don't wing it out at the ends.
2. Apply the darkest shade from the lashline up about halfway up the lid.
3. Apply the middle shade from the middle of the lid up to about halfway onto the browbone, but not over it.
4. Apply the lightest shade, your highlighter, right under your eye brow.
5. Use a soft eyeshadow brush to blend the edges of each color together.
6. Take an angles eye liner brush and smudge just a bit of the darkest shadow underneath the lower lash line.
7. Finish with a couple coats of mascara and...voila!

Tuesday, February 22, 2011

Making Your Eyes POP

By Chava Rosenbaum
Chava is a 26 year old mother of two girls living in Kensington, NY.  She has been a practicing makeup artist for nearly seven years and recently began doing makeup for the exploding field of religious women's theater...in which she also loves to perform! Chava offers lessons to women, teaching them how to apply their own makeup like a professional. In addition to makeup, her passions are singing, comedy and keeping her kids out of her shoe rack. Chava is available to do makeup for simchas and productions in New York. You can contact her to book a consultation or job by e-mailing beautybychava@rocketmail.com
Mention LadyMama when you book me for any occasion and get a 20% discount on TWO faces(including the Kallah's). And as usual, kallahs get a free trial! Spread the word! Call me at 718-986-1211. 


"There is no eye color that some shade of purple with not make pop
Unless its clownish or neon, its almost impossible to go wrong with purples."

MAKING YOUR EYES POP

One of the questions I am asked most often is, "How can I make my eyes pop?" Everyone has heard the "opposites attract" rule, which is the basis behind the eye-color custom palettes you see in drug stores. I'm gonna give you some out of the box methods. 


First is one word: PURPLE! There is no eye color that some shade of purple with not make pop. For blues I go more plum and work my way toward more amethyst shades the darker the eye color gets. But the truth is, unless its clownish or neon, its almost impossible to go wrong with purples. Another way is to go with metallics. As with many other colors, I find they all work well on everyone if you have the right shade. 


But for the most pop value try this: 


Brown eyes: use bronze. 
Green or hazel eyes: use true gold. 
Blue eyes: use a dark gold or brass instead of the predictable silver. 


Gently sweep the metalic color over the eyelid and fade it out by blending just over the brow bone so its a nice wash of color but not too densely applied. Take a smaller brush or even a Q-tip and smudge a bit of the color just under your lower lashes as well. Finish with several coats of a volumizing mascara.

There's another way if you're in a rush. So many women fear bright colors. But colored eyeliner can do the job of both a liner and a shadow, adding both color and definition. So in fact you end up looking more toned down than you might with your regular shadow and black liner. For brown eyes, any jewel tone will pop your peepers, like amethyst or emerald. But the one I find most unexpected for brown eyes is rich, deep saphire blue (not navy, but more of a glossy deep royal blue).  A thin, but not too thin, line on your upper lid, slightly winged out and you can skip the eye shadow and head to work.


For green eyes, use plum liners. Hazel eyes use purple but more in the amethyst range. Blue eyes should go for rich metallic or reddish browns.

For those of you rare but lucky souls who have Elizabeth Taylor's naturally violet eyes, silver and taupe will show off what you've got.

In all cases, highlighting wakes up the eye big time. Using either a highlighting eye shadow or highlighting cream, dab it on the inne corners on the eyes where it meets the nose and the outer corners, blending well. Use eye drops to diminish redness so you look wide awake! 

Sunday, February 6, 2011

Makeup Lessons From My Face Nightmare


By Chava Rosenbaum
Chava is a 26 year old mother of two girls living in Kensington, NY.  She has been a practicing makeup artist for nearly seven years and recently began doing makeup for the exploding field of religious women's theater...in which she also loves to perform! Chava offers lessons to women, teaching them how to apply their own makeup like a professional. In addition to makeup, her passions are singing, comedy and keeping her kids out of her shoe rack. Chava is available to do makeup for simchas and productions in New York. You can contact her to book a consultation or job by e-mailing beautybychava@rocketmail.com
Mention LadyMama when you book me for any occasion and get a 20% discount on TWO faces (including the Kallah's). And as usual, kallahs get a free trial! Spread the word! Call me at 718-986-1211. 


Makeup Lessons From My Face Nightmare

I had a nightmare of a week, face wise. 

I seem to have developed psoriasis on my face, which was compounded by an allergic reaction to the cream I was using to treat it! It looked like a bad burn. Add to that the cold weather and my face was so dry and cracked it bled if I smiled! It itched and looked terrible. So how have I been handling this? As a makeup artist it was bad. My face is my billboard. Dry, cracking skin with concealer caked on top doesn't exactly scream "beauty expert!"

Tuesday, January 25, 2011

Tis the Season: Winter Skincare and Graduation Picture Makeup

By Chava Rosenbaum
Chava is a 26 year old mother of two girls living in Kensington, NY.  She has been a practicing makeup artist for nearly seven years and recently began doing makeup for the exploding field of religious women's theater...in which she also loves to perform! Chava offers lessons to women, teaching them how to apply their own makeup like a professional. In addition to makeup, her passions are singing, comedy and keeping her kids out of her shoe rack. Chava is available to do makeup for simchas and productions in New York. You can contact her to book a consultation of job by e-mailing beautybychava@rocketmail.com

"You have to accept the reality that your skin will be lighter in the 
winter and you must adjust your foundation shade accordingly."

Winter Skincare
BRRRRRRRR! It is COOOOOLD out there. Seriously. Like you can actually hear old man winter laugh at your pathetic attempt to thwart him with your down jacket and thermal gloves.

Now what does this mean for beauty?

Well, for many it means dry skin. The cold dry air can make your face feel rough and itchy. As always, I recommend twice weekly gentle exfoliation with a warm damp washcloth. This is a basic skincare step which is beneficial especially for those with dry skin or over the age of thirty. Exfoliation helps prevent the buildup of dead skincells which can make skin look dull and block the absorbtion of moisturizer.

Moisturize morning and evening. My favorite moisturizer is Garnier Fructis. Costco also has a nice one from the Kirkland/Borghese line which smells like lilies. Yum. Avoid powder foundations in the winter as they can absorb the moisture from your skin that you're trying to keep in. If you only need light coverage, use a tinted moisturizer instead of foundation.

Here's a great money saving makeup tip that I use myself: Make your own tinted moisturizer!
You can do this simply by mixing a bit of your favorite mineral powder foundation with moisturizer. It will last you way longer than regular tinted moisturizer, especially if you use it every day. It also allows you to customize the coverage level. Many women love looking bronzed and darker, but you have to accept the reality that your skin will be lighter in the winter and you must adjust your foundation shade accordingly. Embrace the paler, fresher you! Test out your new shade at the jawline to determine if its the right color for you. It should blend into the neck invisibly.

Time for Graduation Pictures! 
Now many of you young beautiful seniors will be having graduation pictures coming up soon. On one hand, these are the infamous shidduch pictures and you want to look elegant and mature. On the other hand you're probably 17 or 18 and don't wanna look like you're playing dress up with mommy's makeup. So how do you choose your color palette for your graduation pictures? The most foolproof way to look balanced and mild but still elegant is to go monochromatic in light-warm. Meaning, you match your eye shadow, blush and lip color. A peach, nude-pink or light copper/bronze work best for this. It prevents your makeup from drawing attention to any one specific feature, so people see the whole you - fresh but balanced. Use a brightening under eye concealer, a thin line of liquid eyeliner and mascara. This will ensure that you look aidel, yet sophisticated!

20% off for LadyMamas!
On a final note, mention LadyMama and get 20% off the first two faces when you book me for your makeup - for you graduation pictures, wedding or any other event! 718-986-1211

Monday, January 17, 2011

Makeup For All Ages

By Chava Rosenbaum


Chava is a 26 year old mother of two girls living in Kensington, NY.  She has been a practicing makeup artist for nearly seven years and recently began doing makeup for the exploding field of religious women's theater...in which she also loves to perform! Chava offers lessons to women, teaching them how to apply their own makeup like a professional. In addition to makeup, her passions are singing, comedy and keeping her kids out of her shoe rack. Chava is available to do makeup for simchas and productions in New York. You can contact her to book a consultation of job by e-mailing beautybychava@rocketmail.com


   _________________________________________________________________________________


"Many women at this age find their eyelids heavily wrinkled or droopy. 
If this is the case, eyeshadow is not your friend!"


Makeup For All Ages 
How to use the right makeup to look good at every age! 

Greetings! I am so excited and honored to be blogging about beauty for LadyMama! I'll be sharing all sorts of makeup and beauty related information, but before we get into individual looks and tips I want to go over what makeup can and can't do. I have had alot of clients who are past their twenties by a stretch and when I'm done and they look in the mirror, they are crushed. "You can see my wrinkles" they say. "Why does my skin look so rough?" "All those lines by my eyes, you can't do anything?"

Folks, you have to be realistic about your makeup. If you have wrinkles, a good primer can diminish the appearance but makeup won't make them go away. Same for lines under the eyes. If you're skin is rough, dry or scaly when you sit in my chair than the makeup will be applied to rough, dry, scaly skin. You have to exfoliate weekly and moisturize daily for some time prior if you don't want that to show. If you have acne, I can cover the redness...but not the bumps. In short, makeup can correct and enhance color, but not texture. lines, bumps, scales and wrinkles.

Now let's get down to business...

One of the biggest mistakes I see women make is not adjusting their makeup palette with age. And this can actually make you look older! People think that with time they need more makeup to cover up their age but this in fact draws attention to it. Lets go through different ages in a woman's life and talk about what kind of makeup is appropriate and enhancing.

Teens: Teens need very little makeup.  While its tempting when you first start out with makeup to go crazy with the colors, it really does look silly. Teens still have a freshness to their look that requires very little enhancing. I stick to one shade of eye shadow (as opposed to blending different colors and effects) applied lightly, with scarce eyeliner, mascara, blush and lip gloss.

Twenties: Now is the decade of makeup fun! Enjoy it while it lasts. You are mature enough to not look like you're playing dress up and your skin and face are youthful and firm enough to carry most looks and colors. Experiment now (within reason of course!), but remember the ironclad rule of not looking raunchy. Eyes or lips, not both. Either be playful with your eyes or your lip color. Whichever you choose to enhance, keep the other light and simple. Go for rich, buildable mascaras. Use powder compacts to control shine and play with highlights and contours on the face.